Understanding the features in your WordPress admin panel is a great way to start your journey into WordPress web design. The WordPress admin panel serves as the administration center of your WordPress website — this is where you control almost every piece of functionality your site has, from writing a new blog post to installing a plugin or changing your theme.
Learning the dashboard can feel overwhelming at first, especially for anyone transitioning from hand-coded HTML design, which is honestly one of the things that deters some beginners from trying WordPress at all. In reality, the admin panel is organized logically enough that most of it becomes second nature after just a few sessions of exploring it.
This guide walks through how to log in to your WordPress admin panel, what the default dashboard shows you, how to customize which widgets and columns appear on screen, and a full breakdown of every item in the side menu — everything you need to feel comfortable navigating the dashboard on your own.
How Do You Access Your WordPress Admin Panel?
How to login to the WordPress admin panel?
The WordPress admin panel can be found by adding /wp-admin to your site URL:
https://YourWebsiteName.com/wp-admin
If not logged in, WordPress redirects to:
https://YourWebsiteName.com/wp-login.php
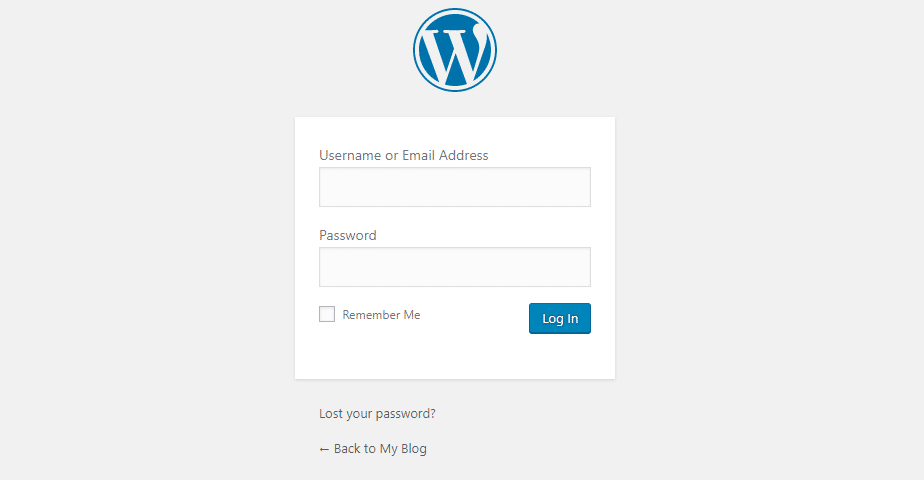
Your username and password are assigned during the initial WordPress installation, and you’ll use that same login page every time you want to manage your site going forward. It’s recommended to change the default login URL as a security measure, since automated hacker scripts constantly crawl the internet looking for websites still using the default /wp-admin or /wp-login.php path, hoping to brute-force their way in.
What Is The WordPress Dashboard?
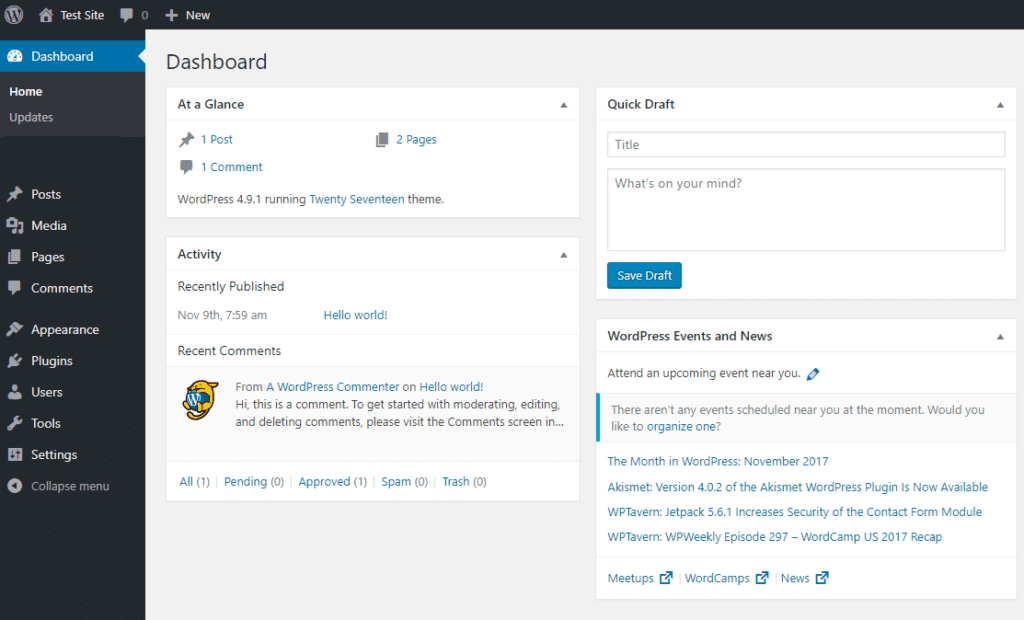
The default dashboard is the first screen you see after logging in, and it includes five main widgets:
- Welcome to WordPress! – Shortcut links for the WordPress functions you’re most likely to need right after setup, like creating your first post or customizing your theme.
- At a Glance – Displays your post, page, and comment counts, along with your current WordPress version and active theme, so you can spot an outdated installation at a glance.
- Quick Draft – Lets you jot down quick notes or start a rough draft for a future post without leaving the dashboard.
- Activity – Shows your latest posts and comments with timestamps, useful for catching new comments that might need a reply or moderation.
- WordPress Events and News – Displays official WordPress news and nearby WordCamp event dates, a nice way to stay connected to the broader WordPress community.
Every widget can be rearranged by dragging it to a new position, so you can prioritize the information that matters most to how you actually use your site.
Add and Remove WordPress Panel’s Screen Options
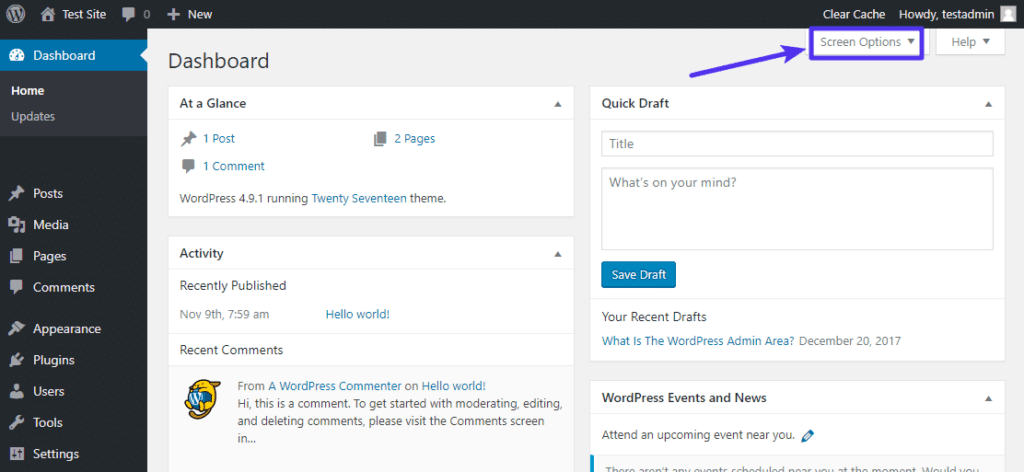
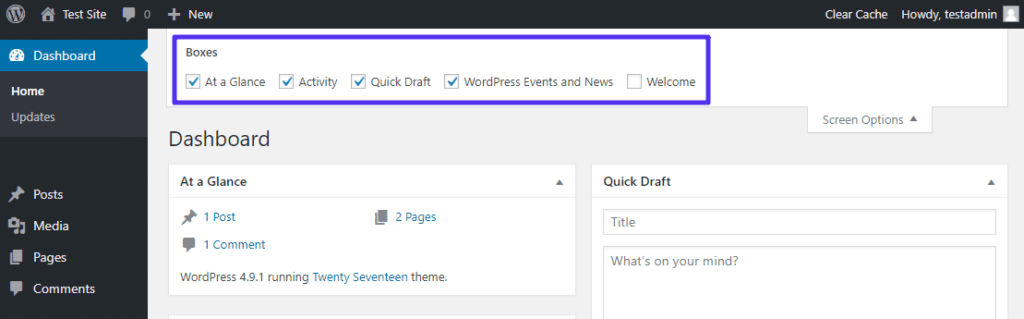
Screen Options let you control exactly which widgets, columns, and boxes show up on a given admin screen — useful for hiding features you never use and keeping your workspace focused on what actually matters to you. Users can customize their dashboard by:
- Clicking the Screen Options tab, in the top-right corner of most admin screens.
- Checking the boxes for any items you’d like to display.
- Unchecking boxes for elements you don’t use, to reduce visual clutter.
Screen Options are available on more than just the main dashboard — most list screens in WordPress, like the Posts or Users list, have their own Screen Options tab for adjusting which columns appear and how many items are shown per page.
WordPress Admin Panel Side Menu
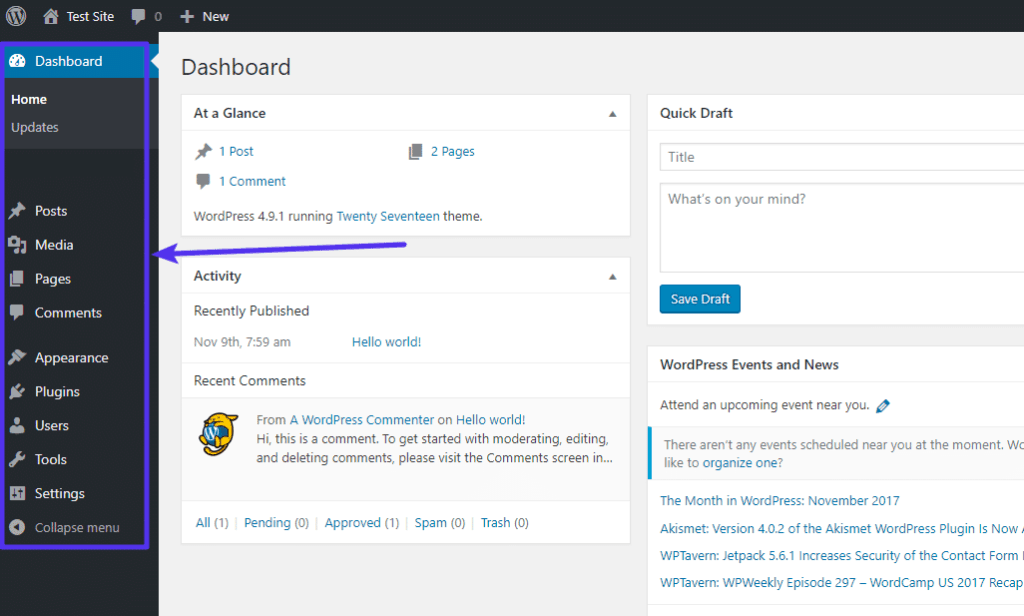
The left sidebar is where you’ll spend most of your time in WordPress, and it contains these primary options:
- Dashboard – An overview of your website’s overall status and activity.
- Posts – Create blog posts, and manage the categories and tags that organize them.
- Media – Manage your image, document, and PDF file library, including everything you’ve ever uploaded to the site.
- Pages – Create new, standalone website pages, separate from your chronological blog posts.
- Comments – Review, reply to, approve, or mark comments as spam before they go live.
- Appearance – Control your website’s overall look, including themes, widgets, and navigation menus.
- Plugins – Browse, install, and manage WordPress plugins that extend your site’s functionality.
- Users – Manage everyone with access to your website and assign them an appropriate role, from Administrator down to Subscriber.
- Tools – Import or export site data, and check your site’s overall health.
- Settings – Customize your site’s name, URL structure, and other core functionality.
The Bottom Line
The WordPress admin panel might look intimidating on your first login, but each section maps directly to a specific, understandable job: writing content, managing media, controlling appearance, extending functionality with plugins, and managing who has access to what. Once you understand what each part of the dashboard and side menu actually does, navigating it becomes second nature.
Take some time to further explore your WordPress admin area beyond just the sections covered here — clicking into each menu item and its sub-items is the fastest way to build real familiarity with everything your WordPress site is capable of. A good habit for your first week is to open every top-level menu item at least once, even ones you don’t think you’ll need right away, just so nothing in the dashboard feels unfamiliar the day you actually do need it.