
If you’ve ever set up a local Ubuntu server for testing and then struggled to move files between it and your Windows or Mac workstation, a Samba server solves that problem in one clean step. It’s one of the most useful tools for anyone bouncing between Linux and other operating systems on the same network.
Samba is free, open-source software that enables file sharing across different operating systems over a network. It acts as a Linux implementation of the Windows SMB protocol, handling four core functions:
- File and print services
- Authentication and authorization
- Name resolution
- Service announcement (network browsing)
This guide walks through how to install a Samba server on Ubuntu, configure a shared folder, and access it from both Windows and Mac clients — a setup that typically takes no more than 15 minutes from start to finish.
What Is a Samba Server?
A Samba server turns an Ubuntu machine into a file server that Windows, Mac, and other Linux computers can all connect to over the same network, without needing any special software installed on those other machines.
Why Web Designers Might Need Samba
If you’re testing a site on a local Ubuntu server or virtual machine, Samba gives you an easy way to move project files back and forth from your main Windows or Mac workstation, without emailing files to yourself or juggling a USB drive. It’s also a practical option for setting up a simple shared folder for a small home lab or a self-hosted local network.
How to Install Samba on Ubuntu
Before installing anything, update your package list. Then install Samba:
sudo apt-get update
sudo apt-get install samba
How to Configure a Samba Share
Step 1: Create the Share Folder
Create the directory you want to share using mkdir:
mkdir /home/username/mysharefolder/
Step 2: Edit the Samba Configuration File
Open the Samba configuration file with a text editor like nano:
sudo nano /etc/samba/smb.conf
Add the following configuration, adjusting the folder path and username to match your setup:
# In the [global] section, add or change the following lines:
server role = standalone server
map to guest = bad user
usershare allow guests = yes
hosts allow = 192.168.0.0/16
hosts deny = 0.0.0.0/0

[linuxsharename]
  comment = Samba on Ubuntu shared folder
  path = /home/username/mysharefolder
  read only = no
  guest ok = yes
  force user = username
  force group = username
What Each Configuration Line Does
A few of these settings are worth understanding rather than just copying:
server role = standalone server— runs Samba on its own, without joining a Windows domain.map to guest = bad user— lets unrecognized login attempts fall back to guest access instead of being rejected outright.hosts allow/hosts deny— controls which IP ranges can reach the share; the example above allows your local192.168.0.0/16network and denies everything else.guest ok = yes— allows access without a username or password, useful for a trusted home network but worth disabling for anything sensitive.force user/force group— makes every file written to the share owned by the same user and group, avoiding permission conflicts between different people accessing the share.
Step 3: Save, Test, and Start the Samba Service
Save the file (Ctrl-X in nano), then test the configuration for syntax errors:
testparm
If the test passes, start the Samba service:
sudo service smbd restart
Step 4: Update the Firewall
Allow Samba traffic through Ubuntu’s firewall:
sudo ufw allow samba
How to Access the Shared Folder
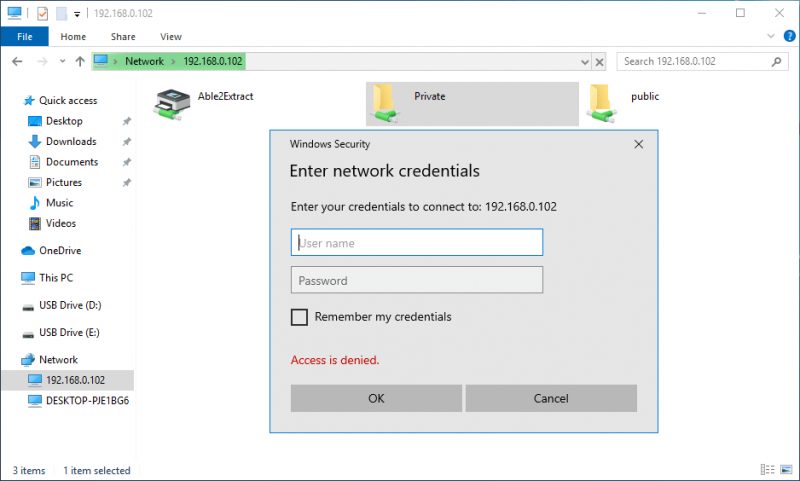
From Windows
- Open File Explorer.
- Click Network in the left pane.
- Enable network discovery if prompted.
- Type
\\followed by the host’s IP address. - Enter the server’s login credentials.
From a Mac
- In Finder, choose Go > Connect to Server.
- Enter the network address, for example:
smb://192.168.0.102
- Click Connect.
- Choose a connection type (Guest, Registered User, or Apple ID).
- Enter your credentials if prompted.
Troubleshooting Common Samba Issues
A few things commonly trip people up the first time they set up a Samba server:
- Can’t see the share from Windows or Mac. Double-check that the firewall rule was applied with
sudo ufw allow samba, and that both machines are on the same local network. - “Permission denied” when writing files. Confirm the
force userandforce groupvalues match a real user on the Ubuntu machine, and that folder permissions allow writing. testparmreports a syntax error. Re-check indentation and section headers (like[linuxsharename]) insmb.conf— a single misplaced line can break the whole file.- Samba service won’t restart. Run
sudo systemctl status smbdto see the actual error message, which usually points directly at the broken configuration line.
Conclusion
Setting up a Samba server on Ubuntu is a quick, practical way to bridge Linux, Windows, and Mac systems on the same network — install the package, create and configure a shared folder, open the right firewall rule, and you’re ready to move files across every device you own without extra software or workarounds.
Whether you’re managing a local test server, a small home lab, or just need an easy way to shuttle project files between machines, this Samba server setup takes about 15 minutes and pays for itself the first time you need to grab a file from your Ubuntu box without plugging in a USB drive.