Python virtual environments are a must-have tool for every developer and data analyst. Whether you’re building a machine learning model, analyzing datasets, or coding a web app, virtual environments keep your projects organized and conflict-free. Python virtual environments let you isolate project dependencies so each project can have its own packages and Python interpreter.
The built-in venv module creates lightweight “virtual environments,” each with its own independent packages. In practice, you create a dedicated folder (often named venv or .venv) for your project that contains its own Python interpreter and libraries. This keeps projects separate so that libraries installed for one project won’t affect others.
In this guide, you’ll learn how to create, activate, and manage Python virtual environments—even if you’ve never used one.
Why Use Python Virtual Environments?
Virtual environments are especially useful for data analysts and new Python programmers needing different libraries for different projects. As the Python Packaging Guide notes, “It is recommended to use a virtual environment when working with third-party packages.”. In other words, always create a virtual environment for your project before installing any external libraries. This ensures you can install packages confidently without worrying about polluting your system Python or other projects. Virtual environments solve a critical problem: dependency conflicts.
Imagine these scenarios:
- Project A needs Pandas v1.5, but Project B requires Pandas v2.0.
- You install a package globally, only to break existing code.
- Collaborators can’t replicate your setup due to version mismatches.
With virtual environments, you:
✅ Isolate dependencies for each project
✅ Avoid version clashes between packages
✅ Simplify collaboration with reproducible setups
✅ Experiment safely without affecting other work
How to Create a Python Virtual Environment
Python offers many options for virtual environments. Two of the primary tools for creating virtual environments: venv (built-in) and virtualenv (third-party). Here’s how to use them across operating systems.
1. Using venv (Built-In Tool)
venv is included with Python 3.3+ and is the recommended method for most users. Navigate to your project folder. Open a terminal (command prompt) and cd into your project’s directory. This will be the location where your new virtual environment folder will live.
Create the virtual environment. Run the following command:
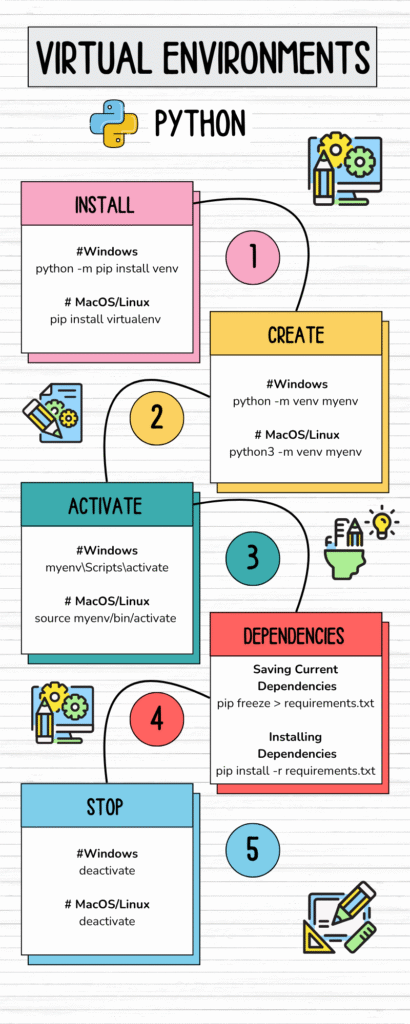
Windows
# install virtual environment (if not installed)
python -m pip install venv

# Create a virtual environment
python -m venv myenv

# Activate it
myenv\Scripts\activate.bat  # Command Prompt
# OR
.\myenv\Scripts\Activate.ps1  # PowerShell

# Check if activated (you'll see "myenv" in the prompt)
MacOS & Linux
# Install a virtual environment (if not installed)
pip install virtualenv

# Create a virtual environment
python3 -m venv myenv

# Activate it
source myenv/bin/activate

# Verify activation
which python # Path should point to "myenv" - After activation, your prompt will change to show the environment name, e.g.
(myenv)Once you see(myenv)in your prompt, the virtual environment is active.
How to Manage Packages in a Virtual Environment
Once activated, your virtual environment acts like a fresh Python installation. Here’s how to work with packages:
Installing Packages
pip install pandas numpy  # Install multiple packages
pip install scikit-learn==1.2.2  # Specific version
Saving Dependencies
Follow the steps below to create a requirements.txt file with libraries or dependencies needed to run the project.
pip freeze > requirements.txt To install your project dependencies to replicate your previously saved environment follow the command below:
pip install -r requirements.txt Key Commands Cheat Sheet
| Command | Description | OS |
|---|---|---|
python -m venv myenv | Create virtual environment (Python 3.3+) | All |
virtualenv myenv | Create environment (requires pip install virtualenv) | All |
source myenv/bin/activate | Activate environment | Mac/Linux |
myenv\Scripts\activate | Activate environment | Windows |
deactivate | Deactivate current environment | All |
pip list | Show installed packages | All |
pip uninstall package | Remove a package | All |
pip freeze > requirements.txt | Save installed packages to file | All |
pip install -r requirements.txt | Install packages from requirements file | All |
python -m pip install --upgrade pip | Upgrade pip in environment | All |
rm -rf myenv | Delete environment | Mac/Linux |
rmdir /s myenv | Delete environment | Windows |
where python | Verify active Python path | Windows |
which python | Verify active Python path | Mac/Linux |
python --version | Check Python version in environment | All |
In Conclusion
Python virtual environments are more than just a technical tool—they’re a gateway to professional-grade coding and data analysis. By isolating dependencies, avoiding version conflicts, and streamlining collaboration, they empower you to work smarter, not harder. Whether you’re training machine learning models, analyzing datasets, or building web apps, virtual environments ensure your projects stay organized, reproducible, and conflict-free.