Let’s start by answering the first questions that came to my mind. Why do I need a Samba in your network? Samba is free and open-source software that enables file sharing across different operating systems over a network. This is an alternative Linux implementation to the Windows SMB protocol. Below are the 4 most common implementations of this protocol.
- File & print services
- Authentication and Authorization
- Name resolution
- Service announcement (browsing)
In this tutorial, I will focus on my journey on installing and configuring samba in my Ubuntu Linux server.
Install Samba Server on Ubuntu
Here is an advice for Linux best practices. You need to update your packages before trying to installing Samba or any other software into your Ubuntu computer. You can do this by running the “sudo apt update” command to download current packages of information from all Linux configured sources.
To install Samba, enter the commands below into your Ubuntu terminal:
sudo aptsudo apt-get update
sudo apt-get install samba
Configuring & Creating Your Share Directory
Creating the Share Folder
Now that Samba is installed on your computer, you need to create the folder that you want to share. I used the command “mkdir” to create the directory or folder that I need it to share. In this case, I named my share folder with the name “mysharefolder”.
mkdir /home/username/mysharefolder/Configuring Share Folder
To edit the Samba configuration you need to access the file located at “/etc/smb.conf”. This is a Samba configuration file that Linux systems used to control their configuration. This file determines which system resources you want to share and restrictions you wish to place on them.
To add the new directory as the new share folder, You need to open and edit the “smb.conf” file by inserting the following command in your Linux terminal: You can edit this file by running the nano word editor command or accessing the file with your favorite GUI word editor. Type the following command to edit your shared folder configuration.
sudo nano /etc/smb.confYou can add the following statements at the bottom of the smb.conf file.
In [global] tag add or change the folowing lines:
 server role = standalone server
 map to guest = bad user
 usershare allow guests = yes
 hosts allow = 192.168.0.0/16
 hosts deny = 0.0.0.0/0


[linuxsharename]
  comment = Samba on Ubuntu shared folder
  path = /home/username/mysharefolder
  read only = no
  guest ok = yes

  force user = username
  force group = username
Saving, Testing, and Running Samba
After modifying the smb.conf file you need to save and test your changes before running Samba. To do this, you need to:
- Press
Ctrl-Xto save and exit the file
Then type testparm on your terminal to run the test program to check the samba configuration file
testparmIf something is wrong you’ll get an error message otherwise go ahead and start the service. Here is the code that runs your file-sharing services.
sudo service smbd restartIt is important to update the firewall rules to allow Samba traffic:
sudo ufw allow sambaAccessing Shared Folder From Windows
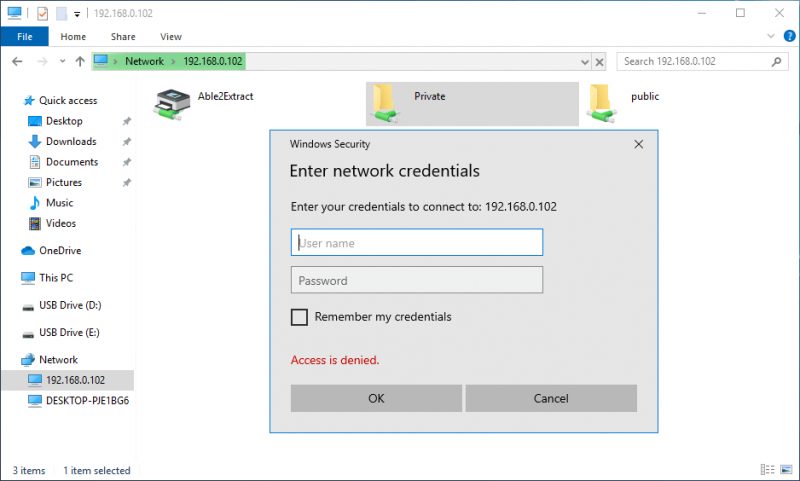
Finally, after sharing your folder from the Linux server. The next step is to login into the computer that you want to acces tha share folder. For Windws.
- Open File Explorer
- Click
Networkthe menu item on the left pane of the File Explorer. - If this is the first time accessing a shared folder you might get a warning message below the address bar. Click on the message and turn on network discovery and file sharing.
- Next, enter
\\followed by the host computer IP address in the address bar of File Explorer - Enter your server login credentials or Samba group login username and password
File sharing is turned off. Some network computers and devices might not be visible.
Accessing Shared Folder From a Mac
- In the Finder Icon on your Mac, choose Go > Connect to Server.
- Type the network address for the computer or server in the Server Address field.For information about the correct format for network addresses, see Network address formats and protocols.
- Click Connect.
- Select how you want to connect to the Mac:
- Guest: You can connect as a Guest user if the shared computer permits guest access.
- Registered User: Connect to the other Mac using a valid login name and password. If “Only these users” is selected on the other Mac, make sure the login name you’re using is on the list of allowed users.
- Using an Apple ID: Connect to the other Mac using an Apple ID. You must be set up in Users & Groups preferences with this Apple ID, on both this Mac and the other Mac.
- If necessary, enter your user name and password, then select the server volumes or shared folders.To make it easier to connect to the computer in the future, select “Remember this password in my keychain” to add your user name and password for the computer to your keychain.
- smb://192.168.0.102
The Bottom Line
That is it. Your Samba services should be running. Now you can go into your other systems and create the combination in order to be able to access this shared folder. This might looks scary if you are new to Linux, but the entire process will only take you no more than 15 min.

Victor Hugo Solis
Master’s Degree in Information Security, a Bachelor’s Degree in Database Administration, and experience as a WordPress Web Designer & Developer.